We’ve Had a Play Around With Weebly: Here’s Our Beginner-Friendly Tutorial
If you click to purchase a product or service based on our independent recommendations and impartial reviews, we may receive a commission. Learn more
To use Weebly, you’ll need to sign up, create a domain name, and then choose a pricing plan. This may sound like a lot, but don’t panic! A Weebly website can be made in eight easy steps, and we’ll show you how.
We’ll cover the basics, from start (signing up) to finish (publishing) with all the creative stuff in between, such as how to make the most of Weebly’s editing features, edit templates, choose a domain, integrate apps, and set up an online store.
So just sit back, relax, and get ready to create.
Tools you may need
Here’s a list of tools you’re going to need to start building your website. Some are essential, but others may be useful, too!- Weebly – you’ll need this to get started!
- Domain.com – a good, cheap alternative to buying your domain name with Weebly
Sign Up
Register with Weebly
Firstly, head over to Weebly.com. You can build and publish your site totally free, so there’s plenty of time to see if you enjoy using it.
To kick things off, click “Get Started” – either using the button in the top right corner or the center of the page. Now type in your name, email, and create a new password to get the Weebly ball rolling.
Choosing the Type of Website You Want to Build
After clicking “Sign Up”, you’re taken to a page with one question: “What kind of website would you like to create?”
You’ll then be offered two options – “I want a personal website” or “I want a business website.” The one you go for depends entirely on your ecommerce ambitions, however, it’s useful to point out that if you opt to build a business website at this stage, you’ll be redirected to Square Online.
If you’re confused by this, let us explain. Square acquired Weebly back in 2018, so the two are actually sister builders. Square Online is entirely ecommerce focused, whereas Weebly is more of a general builder. Our advice? If you want an online store, head straight to Square Online to get started, since Weebly no longer supports ecommerce functionality for new customers.
When you’ve selected “Try Weebly Websites”, you’ll then be directed to Weebly’s template library.
Weebly Registration
Heads up!
Before we move on to the next step, we just wanted to highlight the different plans that Weebly has. There are three paid packages to choose from, but it also comes with a free plan, which you can stay on for as long as you like!This means you can create, publish, and edit your site without paying a single cent.
You can upgrade to a paid plan any time, but we’ll help you with that later – for now, just enjoy building your website!
Select a Theme
Browse Weebly’s Themes
Weebly has around 50 themes, all of which are totally free! There are plenty of categories to choose from: business, portfolio, personal, blog, and more. Once you’ve filtered the library depending on the type of website you’re planning to build, Weebly will then narrow your choices down to a smaller number of industry-specific templates.
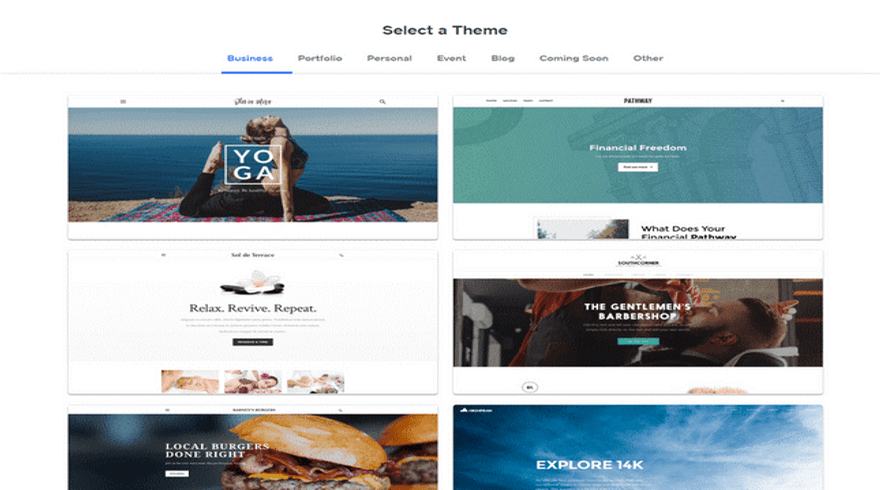
We won’t lie to you: Weebly’s themes aren’t the most attractive on the market. They’re not the worst either, though! They’re not as modern as they could be – which is part of the reason Weebly only scores 2.3 out of 5 for design in our recent research – but they do look reasonably clean and polished. And, unlike Wix, you can change templates at any time, so you’re not restricted by your choice.
Preview Your Favorite Designs
When browsing for themes, you can preview each one by clicking the thumbnail to see how it looks on a full screen. We recommend doing this for every theme that catches your eye. That way, you can navigate around them as if you were a real-life visitor. Then, once you’ve found one you like, hit “Start Editing” in the top right.
If you decide later on that you’d like to try something different, you can change your template by clicking the “Themes” header in the top toolbar. This will redirect you to the template library.
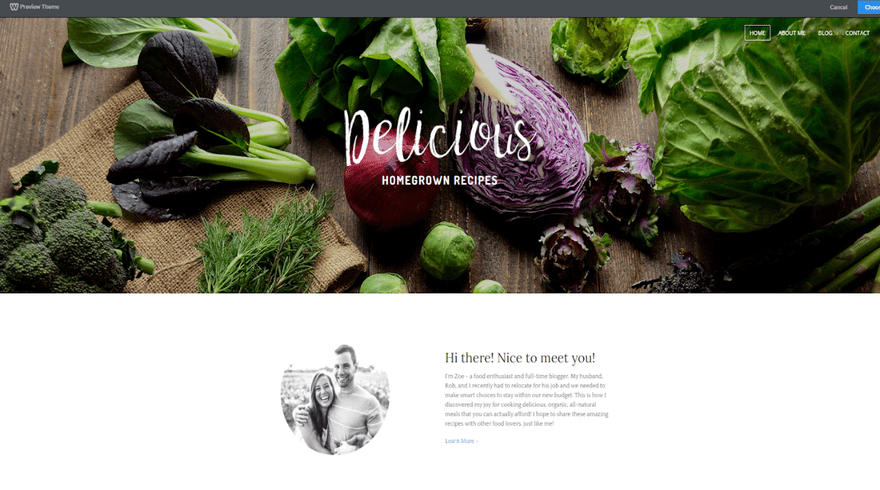
Weebly offers a number of industry-specific options. It has delicious restaurant templates, fresh cleaning service designs, strong-looking personal training themes – you get the idea. These options save you even more design time – you just need to edit the text boxes and images and you’re good to go.
Choose Your Domain
Do You Want a Free or Custom Domain?
Before you start editing, you’ll need to name your website. The name of your website appears in your website address and is called a domain name. For example, ours is websitebuilderexpert.com.
So, how do you go about getting a domain for your Weebly website?
It’s easy – Weebly will automatically prompt you to type in a domain name!
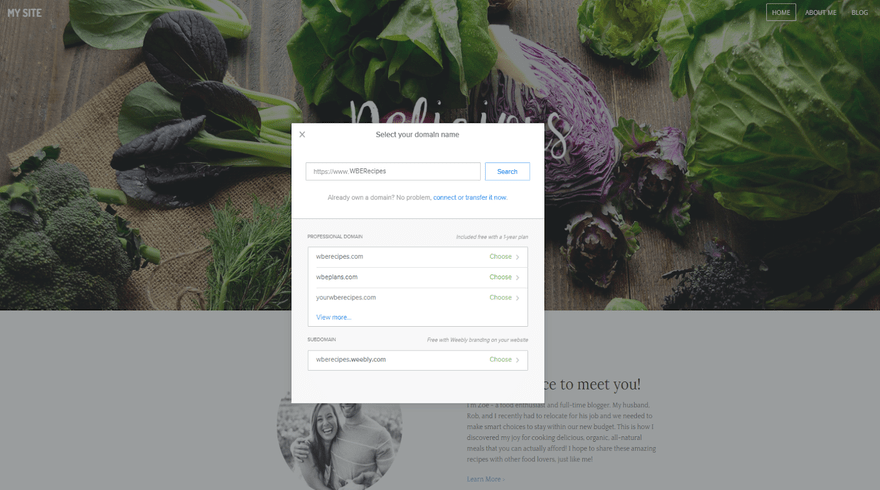
You can get a free domain by choosing the Weebly subdomain. This means your website address will contain “.weebly.com” – it’s not very attractive or professional, but it means you don’t have to pay a cent for your domain.
See the image below for an example of a Weebly subdomain as well as professional, or custom, domains.
Buying a Custom Domain
If you want a custom domain (like ours), you can simply register one through Weebly. Just click “Choose” to register your favorite domain. You’ll have to pay for this, however, and upgrade to a paid plan to actually use your domain.
The upside of using a custom domain is that it’s more professional, memorable, and attractive. Your domain is unique – think of it like your site’s fingerprint – so it’s worth finding the perfect one.
Just how much is a custom domain, though? Is it worth it?
Domains vary in price, but usually fall between $14 and $20 per year.
There are cheaper prices elsewhere (check out Domain.com for great deals – you can get 25% off using the code WBE25), but registering your domain through Weebly is the easiest and quickest option.
Connecting an Existing Domain Name
Already have a domain? You can easily connect it by clicking “connect or transfer now” at the bottom of the popup – then just type in your URL and press “Search”.
Creating a Custom Domain Name
No guide on building a website would be complete without some tips on how to create the best domain name. So, here are our top tips:
- Keep the name short
- Include popular keywords
- Target your area
- Make it memorable
And voilà! You have a beautiful domain just waiting to be used – let’s get on with building your site so you can make good use of it.
Further Information
- Domain Name Beginner’s Guide: Want to know more about domain names? Our guide can help you!
Design Your Weebly Website
Weebly Design Overview
After choosing your domain name, it’s time to start customizing your website. Weebly scored 2.3 out of 5 for design in our research, so although this isn’t one of its strong suits, it still comes with enough scope to give your template its own unique spin.
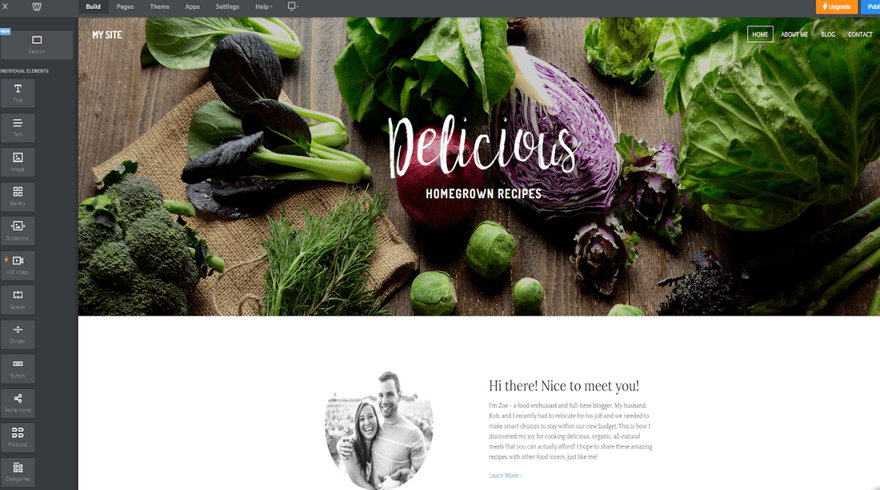
You’ll automatically be taken to the Weebly website editor once you’ve completed step two. This is where you’ll let your creative juices flow. We’ll go through the menus and features one by one, but here’s what it looks like at first glance:
Editing Text Boxes
Weebly is a “What You See Is What You Get” (WYSIWYG) website builder. This means you can click and edit, as well as drag and drop media, without needing to know any code. So to update the text, simply click the box and type.
Editing the Background
You can customize your theme even more by changing the background. Simply click the background image and select “Edit Background”. From there you can change the image, scrolling effect, and page alignments.
Adding New Elements
This is where you add the fun stuff. Using the “Element Menu”, on the left hand side, simply drag and drop your chosen media icon anywhere on the page. You can pop text, videos, buttons, and more almost anywhere you like. There are some limitations though. Weebly’s templates are organized in rows, so you’ll need to stick to these blocks when moving elements around, which can make full customization tricky.
Take a look at the Element Bar below for just some of the elements you can choose from:
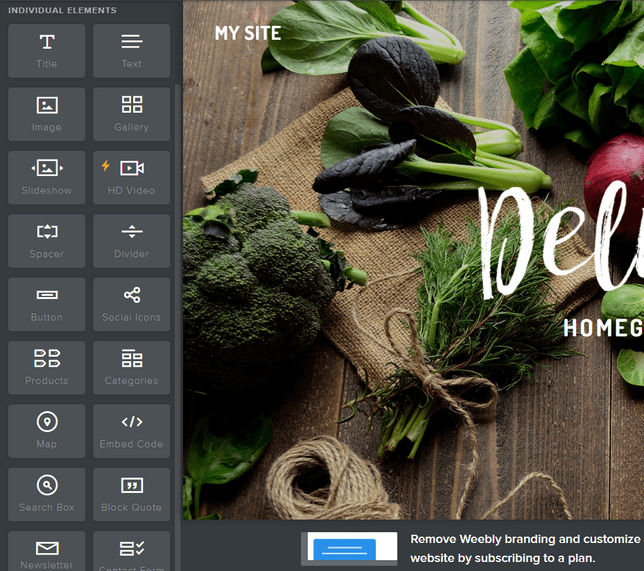
Any element with the lightning bolt symbol next to it can’t be used on the free plan – you’ll need to upgrade to use these features. However, everything else is free for you to play with!
Let’s say you want to add an image. Drag the icon where you want, then click “Upload Image”. A popup will then give you some options: you can upload from your computer, or press “Search” and find a free Weebly image.
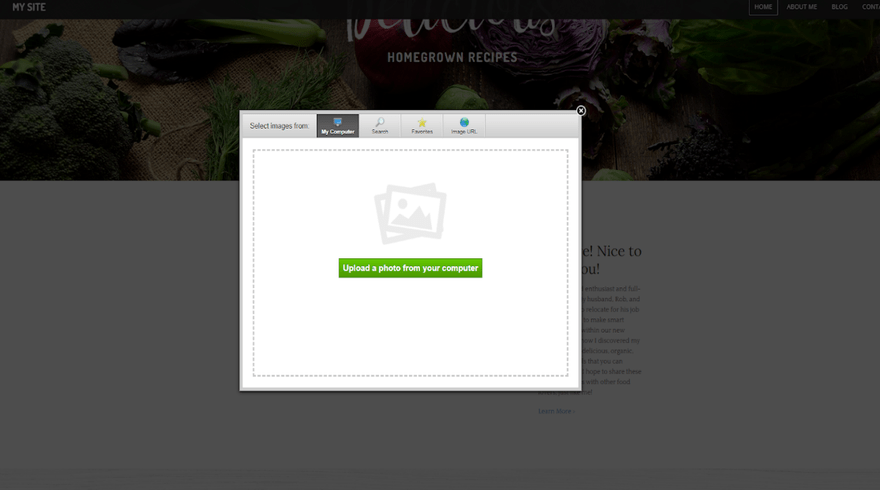
To edit other pages on your Weebly website, simply click “Pages” on the top Navigation Menu and choose a different page. Adding elements is the same process for each page – just drag, drop, and click your way to a beautiful website.
From the Navigation Menu, you can make the most of Weebly’s flexibility. Change your theme, edit your site settings, move to a different page – it’s all there.
Adding New Pages
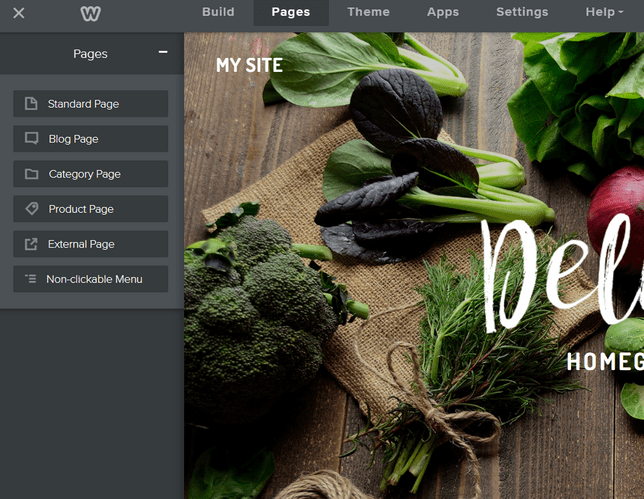
It’s easy to add new pages to your website. Simply go to the Pages tab in your menu and click the plus icon in the left-hand sidebar. A drop-down menu will appear with different types of pages.
Select the type of page you want to create – a blog page, for example – and give it a name. As you do this, Weebly automatically loads the page for you, with pre-filled images and content for you to make your own.
Remember to click “Done” to save your new page’s settings. Once you’ve done this, return to the “Build” menu tab to edit the page just like you would normally!
Changing the Color Scheme
You can change the color theme of your page by heading to the Theme section of your dashboard. For some themes you simply have the options of light or dark, while others give you actual colors to switch between.
This is fairly basic and you won’t see massive changes to your theme, but you can add a custom color to the range of choices if you want to.
Adding New Layouts
To really personalize your website, you’ll want to add new sections to the pages you’re editing. Apart from adding new elements, there’s also the option to add new sections.
This element sits at the top of the left-hand sidebar above all the other elements – simply drag it to where you want it on the page and let go.
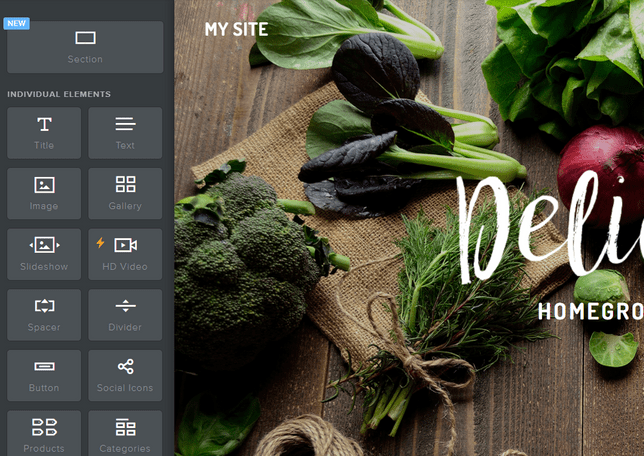
It’ll give you a list of options: Gallery, Contact, Menu, Featured, and Team. Select the one you want to add.
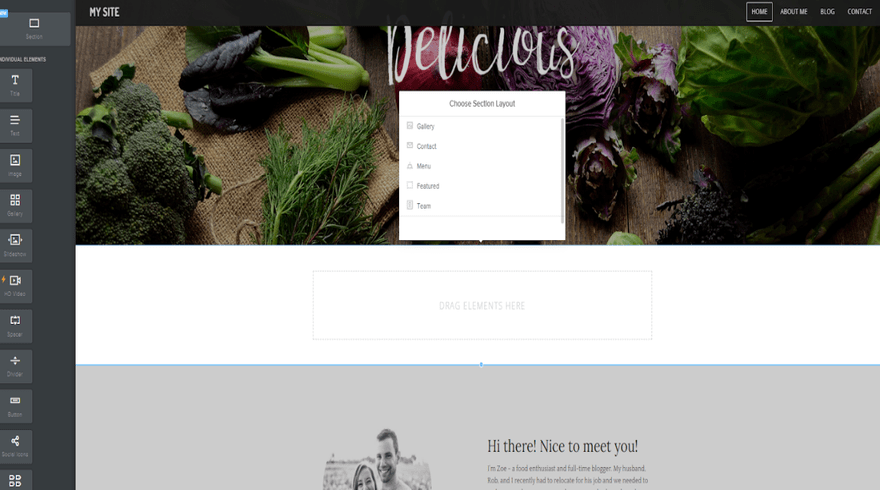
Weebly then gives you a list of different layouts to choose from, so you can pick the one you like the best. Click on the layout you want, and it’ll appear on your page. Click “Save” in the popup box, and get editing!
Deleting Sections
We all make mistakes, we all change our minds, and we all learn differently – we’re only human after all! That’s why it’s important to know how to delete elements on your site, as well as adding them.
You might want to try out a gallery on your homepage, but then decide it doesn’t work. You’re not stuck with it forever – simply click on the element, and look for the small blue cross that appears in the top right corner of the editing box.
Click on that cross, the box will turn red, and you’ll have the option to delete that element.

This is how to delete small elements such as galleries, text boxes, images, buttons, and more.
If you want to delete a larger section such as a background, simply click on the area you want to remove. You’ll see a few options appear: Edit, Move, and Delete. Click the Delete button and you’ll see a popup asking you if you’re sure you want to delete. At this point, you can either cancel or confirm – if you click “Delete” then that section and everything inside it will be deleted.
This “are you sure?” method means you won’t scrap any bits of your website by accident, which is a relief!

Check out our video below on how to use Weebly’s basic elements.
Further Information
- Squarespace Review: If you want to see the reigning champion of design, check out our Squarespace review.
- Top 10 Best Practice Tips for Website Design: Review our top tips on web design and feel inspired.
Add Apps
Searching for Apps
Also in the top Navigation Bar is “Apps”. You guessed it – this takes you to the Weebly App Center. Whatever your website, Weebly has an application to help boost your performance. We recommend adding some popular apps like “Site Booster”, and “Content Color Box”.
Not only does it categorize apps for sales, traffic, social and Weebly-specific, but it even recommends apps just for your website. It’s like having your own personal shopper – the American dream, right?
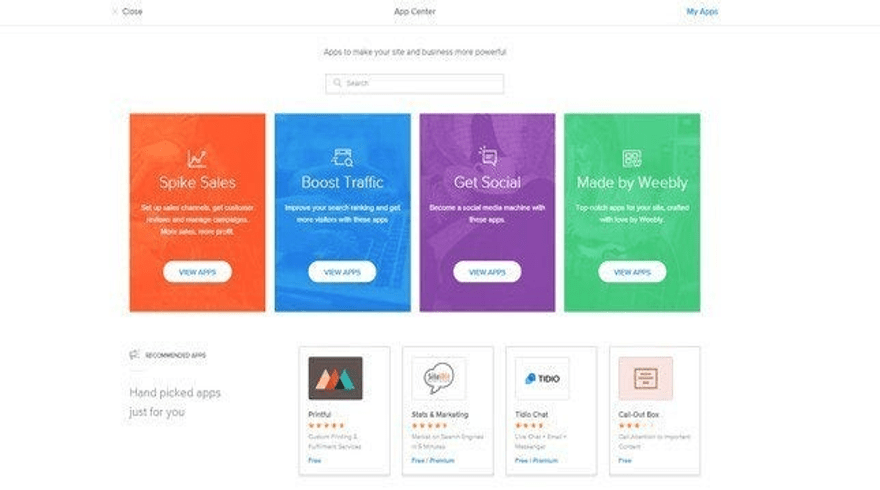
Weebly has an impressive amount of apps – over 300 apps, to be (sort of) precise. More than 50 are free, and there are always new apps being added, so you won’t struggle for choice.
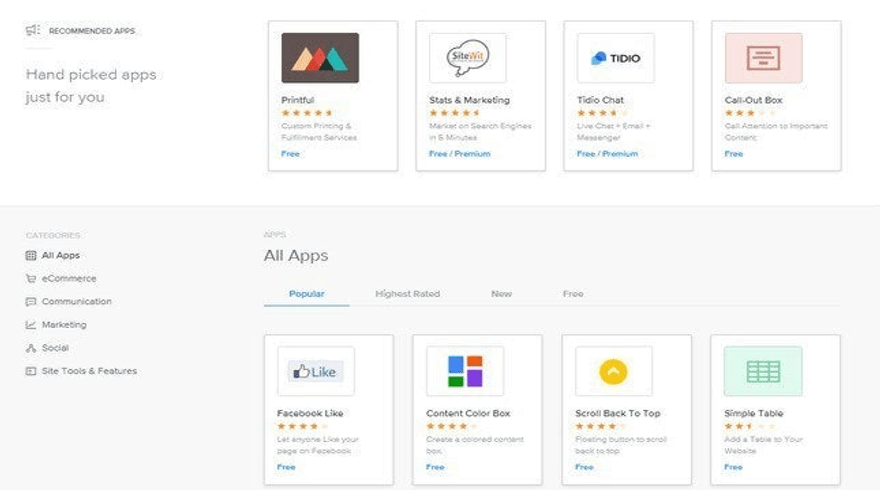
Don’t feel overwhelmed – you can sort by “Popular”, “Highest Rated”, “New”, and “Free”. Or just search for whichever type you want, whether it’s an FAQ section, countdown timer, or social feed. You can even categorize them on the left-hand side.
Also, before making any purchases, you can check the user ratings on each thumbnail. Can’t find one you like? Scroll to the very bottom and you can submit a new app idea, or even develop your own (if you can code).
Installing Apps
To install apps, click on the one you want and then find the “Add” button. A popup box will appear – you need to click ‘Connect’ to install the app and agree to any terms.
Once the app has installed, you’ll be taken back to your website. The app will automatically appear at the bottom of the left-hand sidebar, under the “Installed Apps” section.
Once your app is installed, drag it onto your page as you would any other element.
Choose a Price Plan
What Pricing Plans Are Available?
Up until now, we’ve assumed you’re happily building on the free plan. However, as we’ve seen there are cases where you might want to upgrade – for example, to unlock advanced features.
Let’s take a quick look at Weebly’s prices and how you can upgrade if you want to.
You already know about Weebly’s free plan. There’s no time limit on it, and you can actually publish your site without paying a dime. However, it has its drawbacks – no custom domain, limited features, and Weebly adverts displayed on your site.
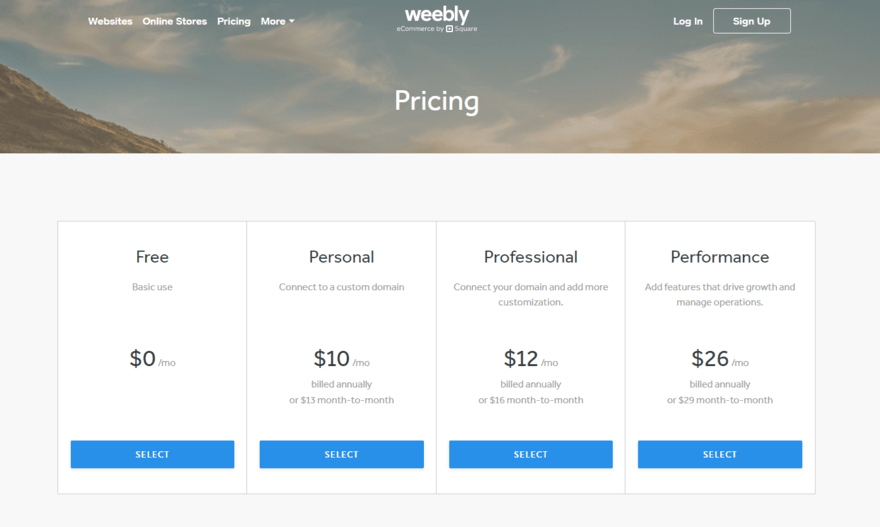
Out of all of the website builders we tested, Weebly is also one of the worst when it comes to value for money. Despite its free plan, Weebly scores 3.2 out of 5 in our pricing research, meaning its three paid plans are not the most cost-effective option out there:
- Personal: $10 per month, billed annually
- Professional: $12 per month, billed annually
- Performance: $26 per month, billed annually
Which Plan Do We Recommend?
If you just want to start a hobby site, or a blog, we recommend the Personal plan. You will still have to deal with adverts on your site, though, so if you’re looking to be taken seriously, we recommend upgrading to the $12 per month Professional plan. It unlocks more features and it’ll help your website be taken more seriously.
It also offers much better value for money than the Personal plan. Considering how many more features you get compared to the Personal plan, paying $12 per month for the Professional plan seems like a total steal! It’s the cheapest plan for creating a truly professional website.
Further Information
- Weebly Pricing Review: Read more about Weebly’s prices and value for money in our detailed look at its pricing.
- Weebly Pro Plan Features Review: Why do we recommend the Pro plan? Is it worth it?
Publish Your Weebly Website
Publishing Your Site
If you’re happy with what you’ve created, you can now publish. Great! If you’re not completely happy, don’t worry – you can revisit the Weebly website editor to make some changes after you publish.
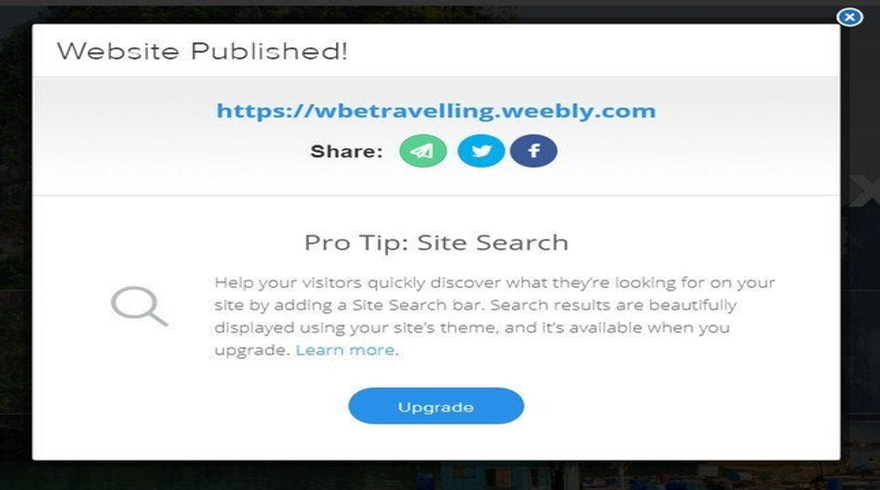
To publish your site, hit the blue “Publish” button in the top right corner. You will then receive a popup telling you it’s published, and how to integrate a “Pro Tip”. Weebly really wants your site to succeed.
You’ve now published your Weebly website. Like we said, it’s easy to update and edit at any time. You can also upgrade your plan if you want to. Just head back to Step 1 to view the plans and their benefits.
Unpublishing Your Site
If you publish your site, but then change your mind, you can head to your Settings and scroll down to the very bottom. There, you’ll find an option to unpublish your site with a single click. Easy!
Improve and Grow Your Website
Once your site is live, there are a few things you can do to encourage its growth and success. Don’t just leave it to languish all alone – instead, make regular tweaks, edits, and changes to keep your site fresh and relevant.
Edit Your Content
Go back and edit content – update old information, write new articles, and add extra sections to old pages. Fresh content will not only keep your visitors happy, but it’ll also show Google that your site is relevant and active.
Optimize for Google
You want your site to rank in Google’s search results, right? Right. It’s the best way of getting more traffic and boosting your online presence. The way to climb up through the ranks is by mastering SEO (Search Engine Optimization).
SEO is the process of boosting your site’s chances of ranking highly in the search results, and involves lots of factors. Some are super simple, like using headings to structure your content, while others are a little more advanced, like optimizing your video content.
Weebly has a great range of SEO tools to help your site rank, as well as beginner-friendly guides to walk you through each step. Start off with its Ultimate SEO Guide and you’ll be a pro in no time!
Promote via Social Media
Everyone is on social media these days – and you want everyone to see your site!
Pick a couple of social channels that suit your site – for example, Instagram is perfect for photographers, and Pinterest is ideal for selling handmade items. Then start sharing snippets of content, blog posts, images, and more to engage your visitors and gain followers.
Get Marketing
Email marketing can be your best friend. It’s a great way of releasing new product information, letting your visitors know about news and events, or enticing them back with sales and discounts.
Weebly has its own email marketing system called Weebly Promote, which helps you build your mailing list, easily create customized emails, and track your emails’ performance. This is free to use for your first two campaigns; after that it costs $8 per month.
Weebly also has good blogging tools, so you can combine blog posts with email campaigns and newsletters to keep your visitors informed and engaged.
How to Use Weebly: Summary
So, from Sign Up to Publish, these are the eight steps for creating a Weebly website. It really is that simple!
If you’re looking for a basic, no-frills-attached website, then Weebly could be a good fit for you. It has a free plan that you can stay on for as long as you’d like, and it’s pretty straightforward to use.
Ultimately, Weebly is a fairly average builder, and it doesn’t really excel in any area, from value to money to website features. Where Weebly is really let down is its design options. Yes, its templates are clean and professional, but they’re not as contemporary as we’d like and they’re overshadowed by more sophisticated templates from the likes of Squarespace and Wix.
If you do want to try out Weebly, we’d recommend choosing a premium plan for a more advanced, personalized Weebly website that truly works for you.

34 comments