How to Advertise On Facebook: My Nine Easy Steps
We may receive a commission from our partners if you click on a link and purchase a product or service on their website. Learn more
With over three billion monthly active users, Facebook is the most widely used social media platform in the world. So it should be no surprise that learning how to use and advertise on Facebook can be a gamechanger if you want to grow your business online.
The Facebook advertising process has changed a lot throughout the years, and it now offers plenty of new optimizations. While the new additions can be used to boost your campaign’s success, they can also leave both new and experienced marketers feeling a little bewildered.
But don’t worry, it’s simpler than you think! Whatever your skill level, I’ll show you how to advertise on Facebook in nine easy steps, from initial setup to publishing your ads.
The Different Types of Facebook Ads
There are a plethora of Facebook ad types that your business can make use of:
| Ad type | Description |
|---|---|
| Photo | These ads appear as images alongside a description and headline. |
| Video | These ads appear similarly to photo ads, but in video format. They can also include sound. |
| Carousel | Displays between two and 10 images or videos in one ad. A user can scroll through the carousel and see a unique CTA, link, headline, and description for each. |
| Slideshow | These ads are videos made from a collection of images with sound and text. |
| Collection | Collection ads show a large cover image or video alongside multiple smaller images. When any is clicked, users will be taken to another page where they can learn more and purchase products. |
| Playable | These ads give users a short interactive preview of an app. |
| Messenger | These ads can appear as either stories or inbox messages. |
Nine Steps to Advertise on Facebook
If you want to learn how to advertise on Facebook, you’ll have to understand the three tiers that make up a campaign:
- Ads – these are the individual advertisements that your target audience see
- Ad sets – these are groups of ads that are tied together through a commonality
- Campaigns – two or more ad groups are grouped into a campaign
If you’re well versed in advertising on TikTok or Instagram, Facebook ads follow a similar creation process. If not, don’t worry, I’ll walk you through it now. We’ll simply work backwards, creating a campaign, then ad groups, then finally individual ads.
Let’s get started!
1. Register for Meta Ads Manager
First, head to Meta Ads Manager and log in with your business’ Facebook account. This is the platform you’ll use to make, manage, and monitor the progress of your Facebook ads.
Before you can start running ads, you’ll need to go to the “Account overview” tab and complete the following:
- Create a Facebook page (if you don’t already have one)
- Add a payment method so you can pay for your ads
- Verify your phone number
2. Create a Campaign
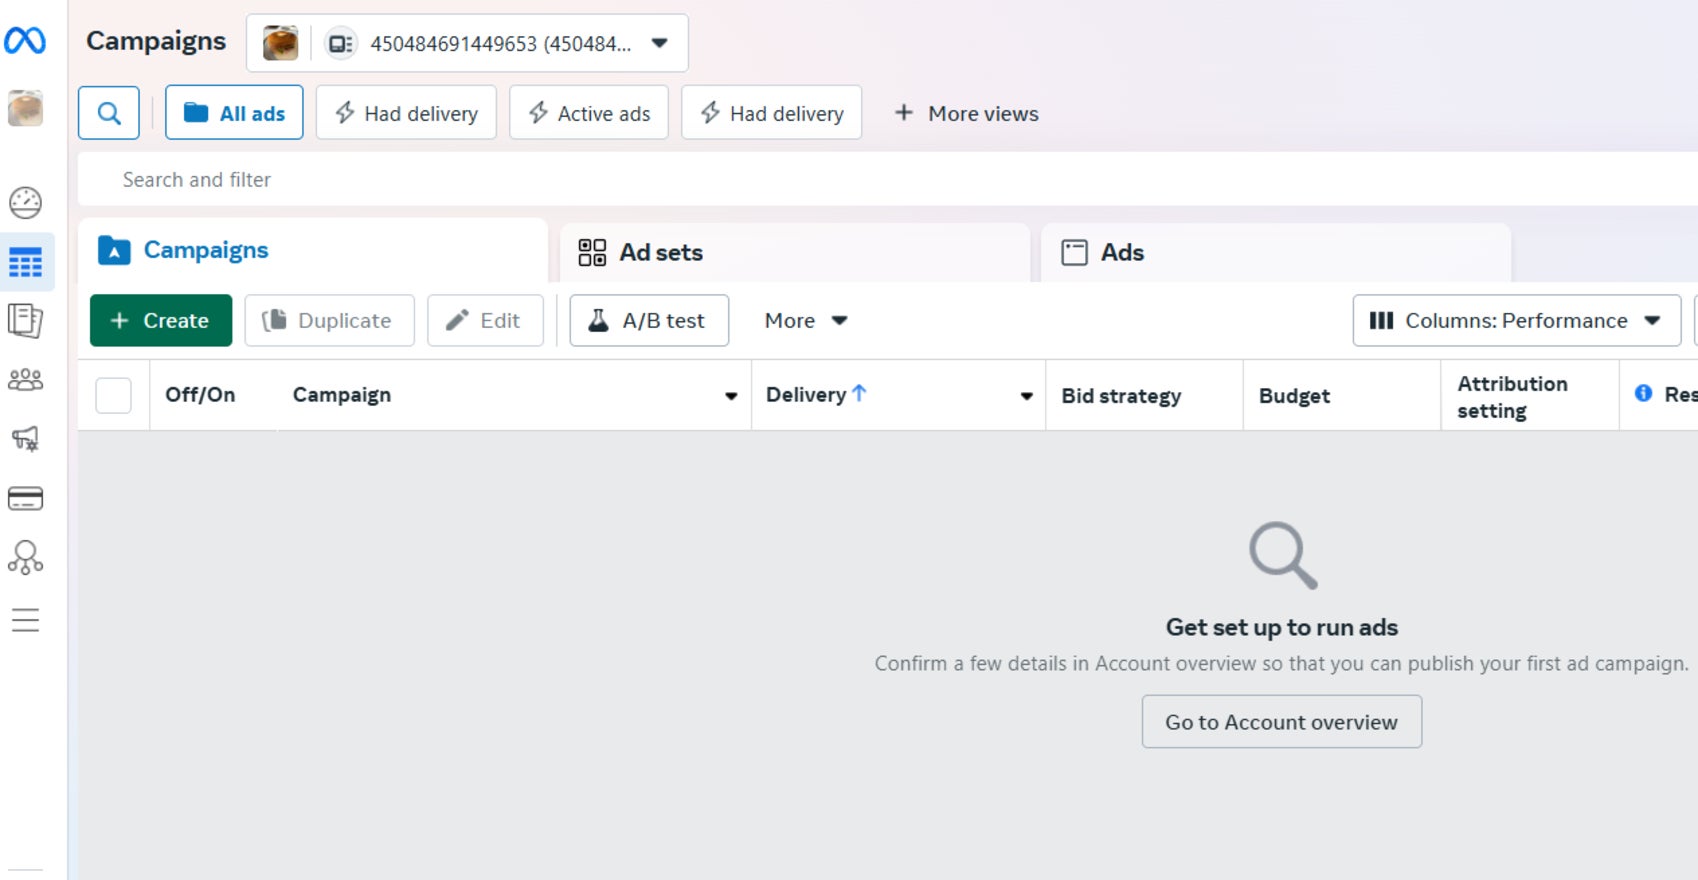
The first step to running ads on Facebook is to create your first campaign. Select the green “Create” button under the campaigns tab on your dashboard.
3. Choose Your Buying Type and Objective
Next, choose one of the following campaign objectives:
- Awareness
- Traffic
- Engagement
- Leads
- App promotion
- Sales
Each objective has unique settings designed to create ads that achieve that goal, so it’s important you choose the objective that represents your most desired outcome. For example, selecting the “Awareness” objective will help you create ads that increase your brand awareness, or if you want to attract customers to your online store, “Traffic” would be more suitable.
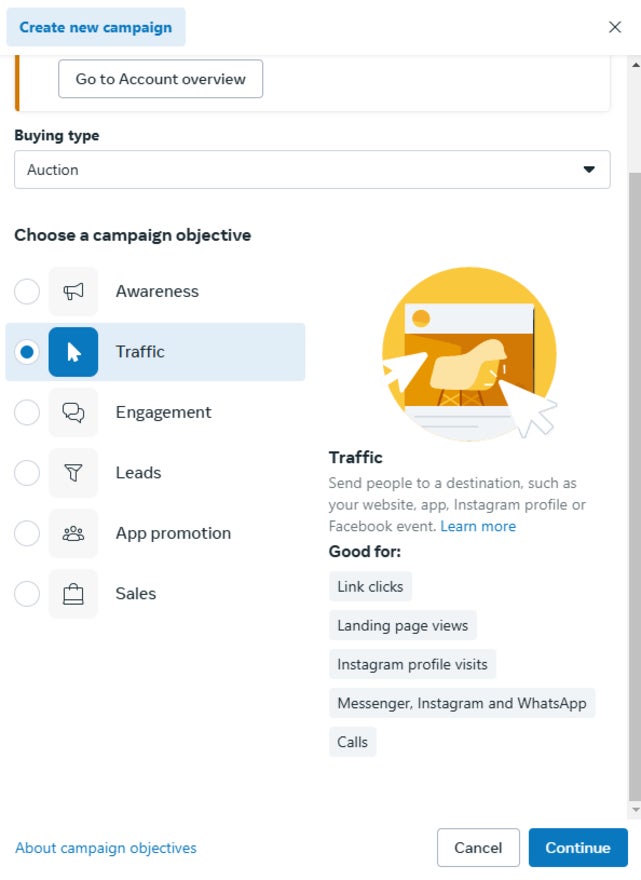
For most objectives, you’ll only be able to select auction as your buying type, but for traffic and awareness objectives, you’ll have the choice between auction or reservation. Here’s the difference:
- Auction – This is the most commonly used buying type, which involves bidding for your cost per action and then paying as your ads are served. You’ll have lots of choice to change your budget and other features throughout the lifetime of your campaign.
- Reservation (previously reach and frequency) – This option lets you buy and plan campaigns in advance, which offers more predictable performance results but less flexibility with changing.
4. Choose Your Campaign Setup
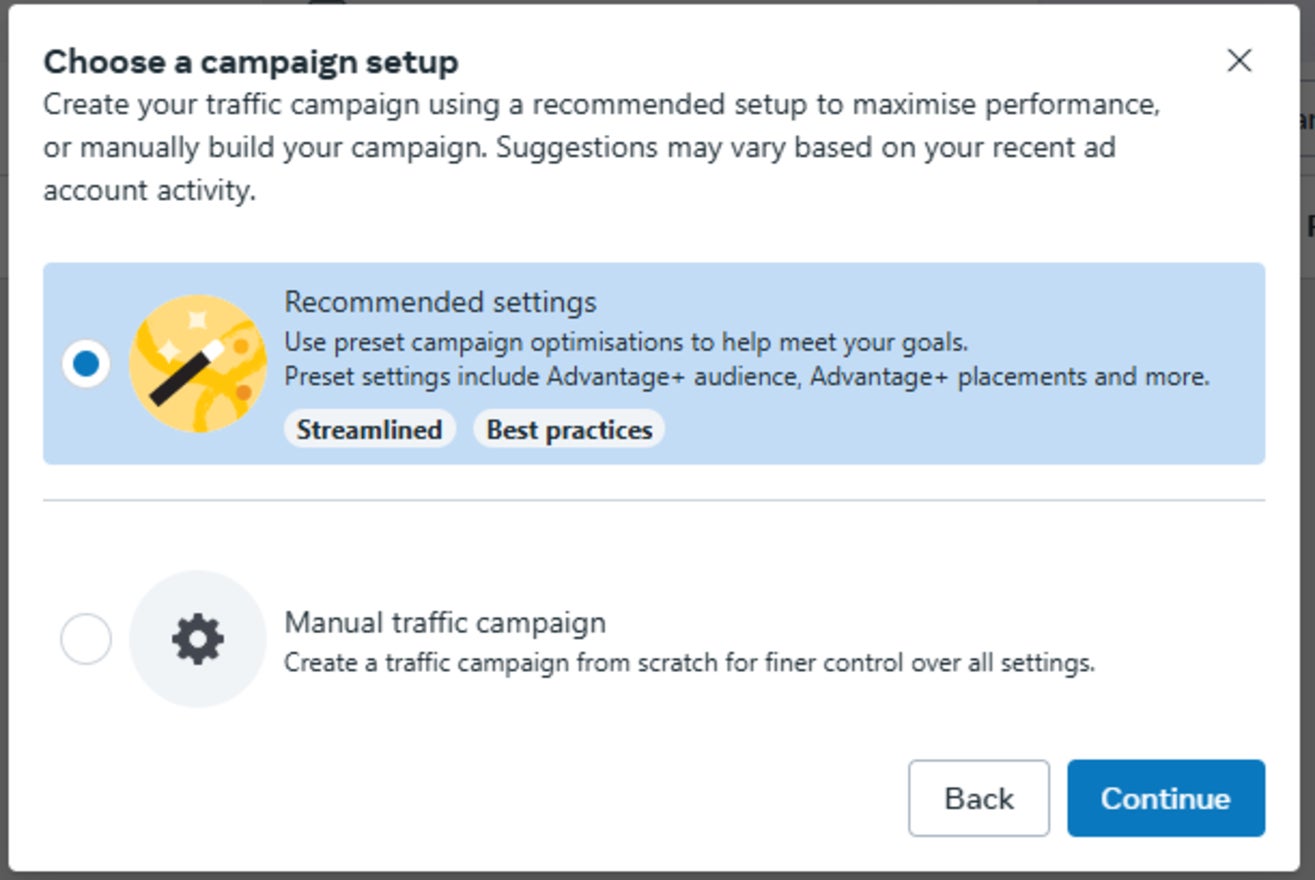
You can then choose to set up your campaign with the recommended settings or build it from scratch, which will give you greater control over the settings.
I’m going to select “Recommended settings” for my campaign. This is a lot more beginner friendly, offering optimizations in multiple areas while still giving you control over the important parts of your campaign.
5. Decide on Your Campaign Settings
On the next page, you’ll have to name your campaign and declare if your ads fit into the “special ad categories” of credit, housing, employment, or political and social issues.
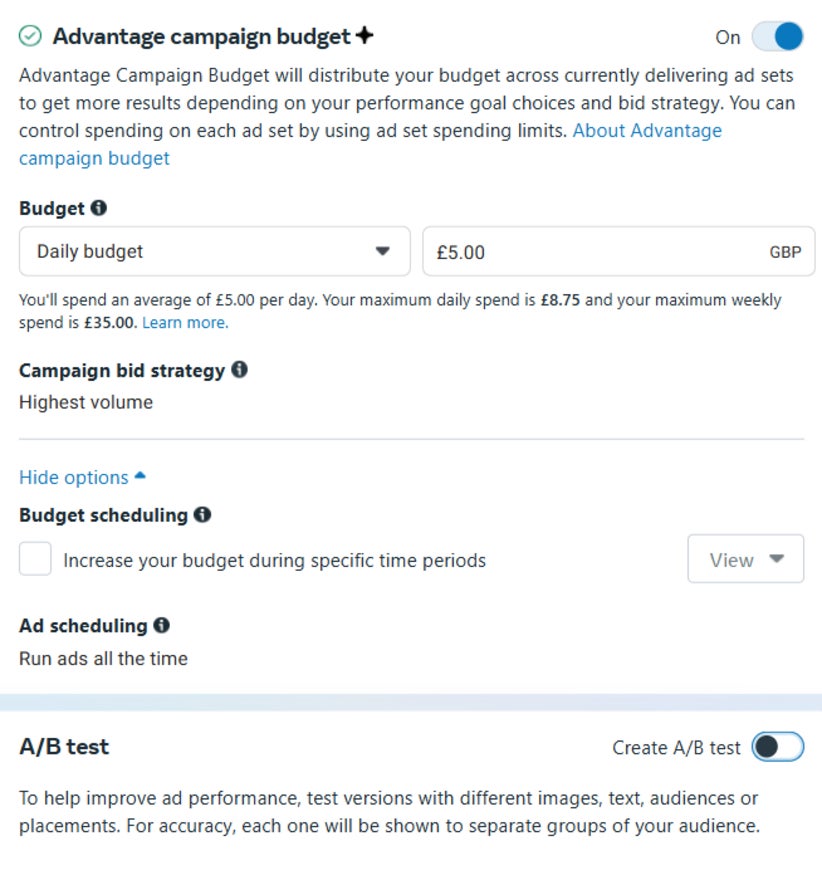
When you scroll down, you’ll see the option to enable Advantage Campaign Budget (formally known as Campaign Budget Optimization). This will monitor the success of your ad groups and use this information to distribute your budget to achieve the best results, rather than splitting it evenly.
6. Create Your Ad Set
Now you’ve decided on your campaign settings, you can dive into your Ad set, which is where things start to get specific.
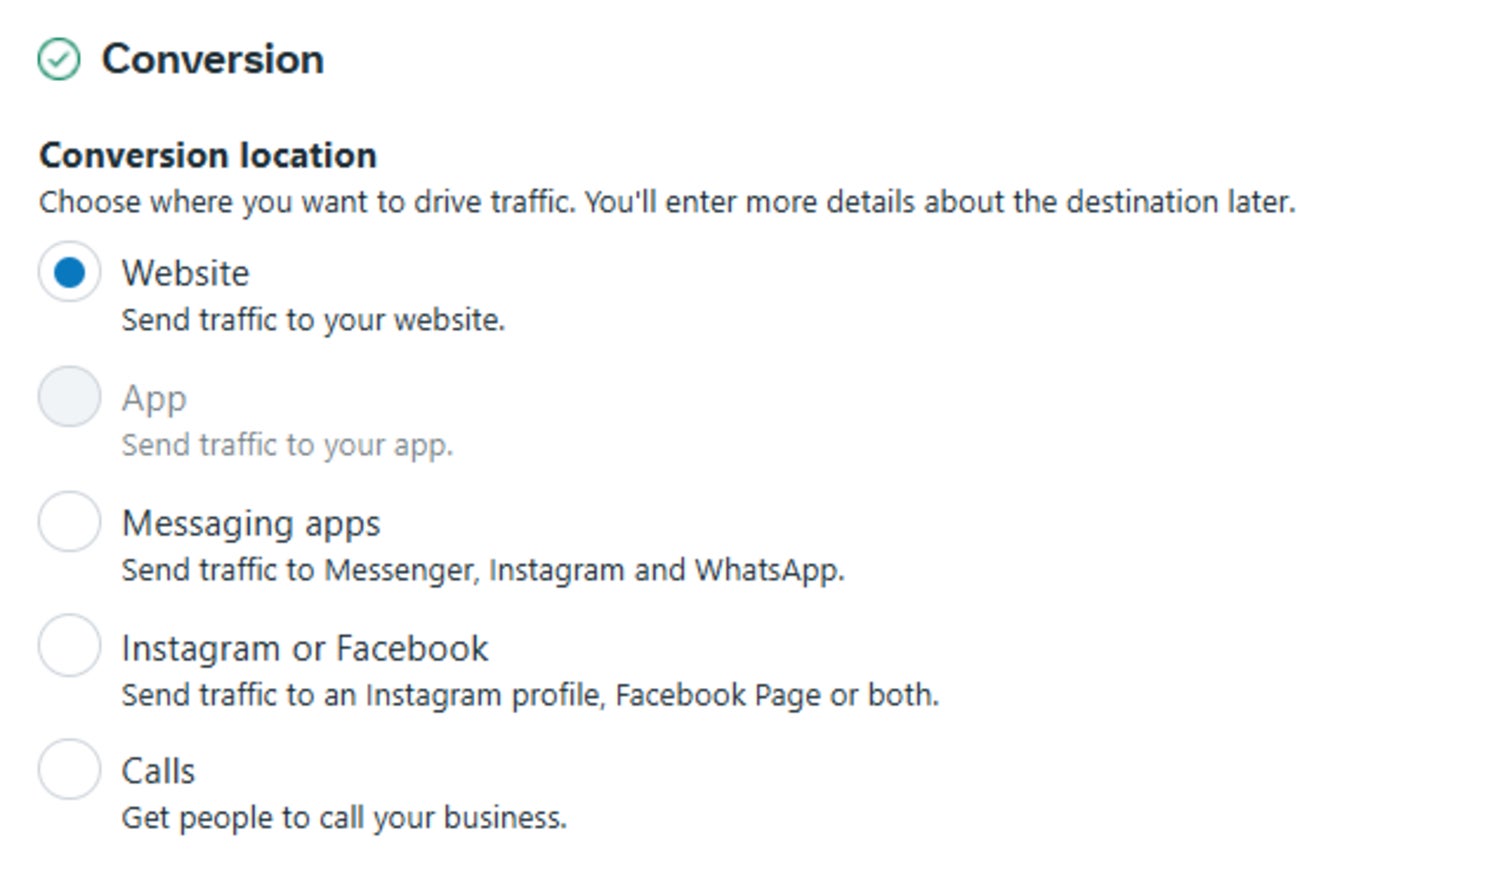
The first box on this page is unique to the objective you picked. For instance, with my objective of increased traffic, I was prompted to choose where I’d like to increase my traffic to.
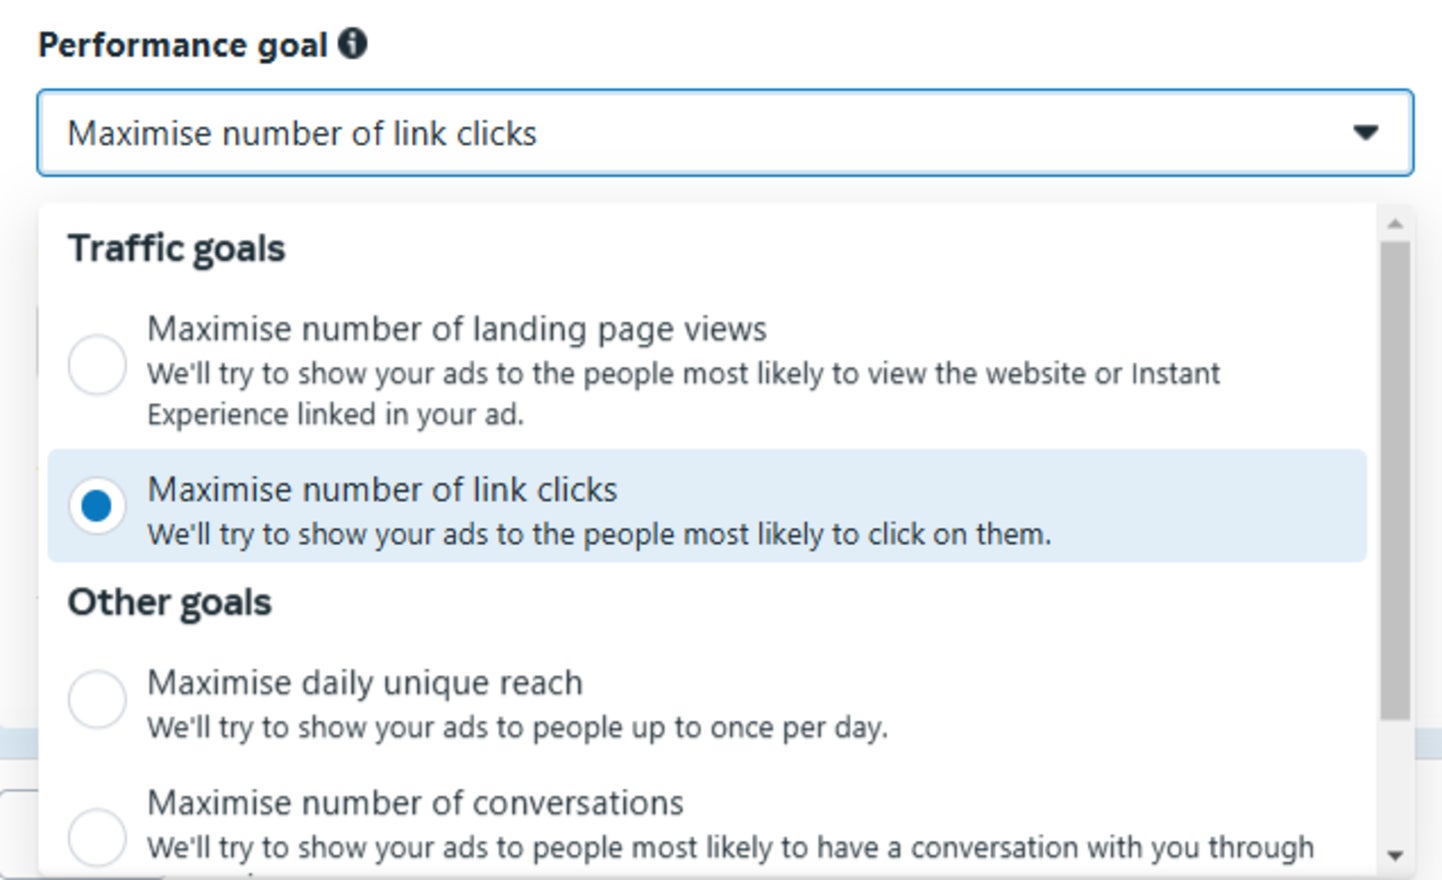
Each campaign has a unique set of “Performance Goals” for you to choose from. These measure the success of your ads. You can only pick one per ad set, so you’ll have to create multiple sets if you want to cover more.
7. Decide on Your Budget
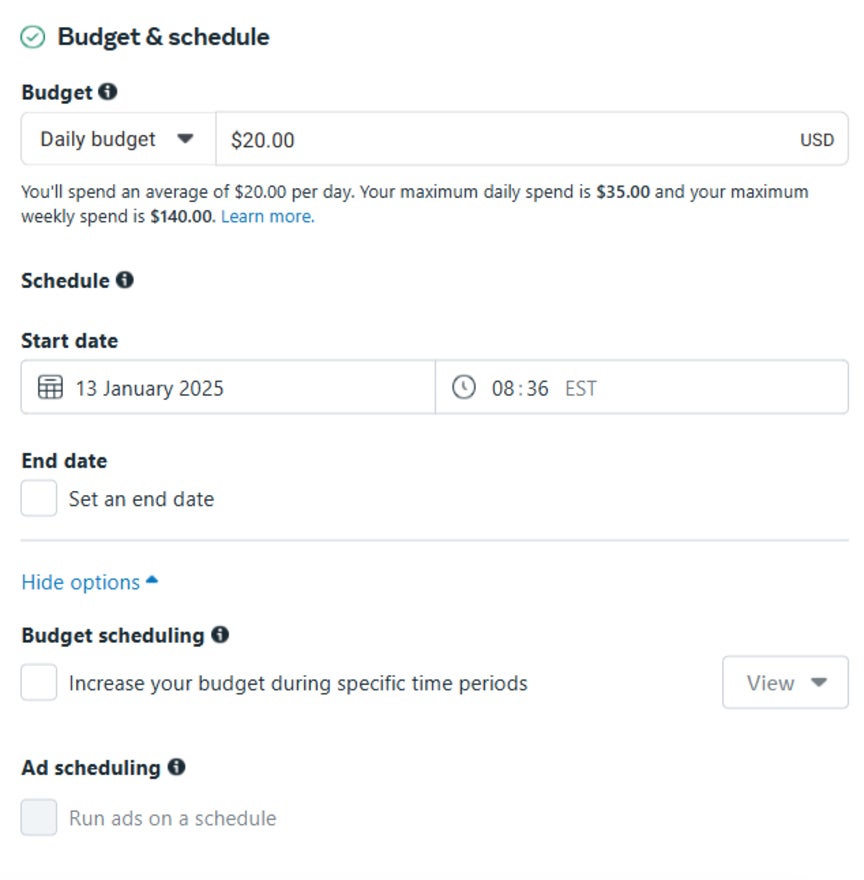
Next, input a daily or lifetime budget, which is the maximum amount you want to spend on your ads within that Ad Group.
A daily budget is an average daily spend over the course of a week – not a strict monetary cap. On high opportunity days, Meta can spend up to 75% over your budget, but it’ll still hit your weekly budget by spending less on other days. For instance, if my daily budget is $20, Meta can spend $35 in one day while still staying within my weekly cap of $140.
With a lifetime budget, you’ll input the start and end date of your campaign and the total amount you want to spend throughout. By the end date, the whole of your budget will have been used.
| I recommend daily budgets if… | I recommend lifetime budgets if… |
|---|---|
| ✔️you haven’t decided how long you want to run your campaign for, or will decide based on its performance ✔️ your budget is likely to fluctuate while your campaign is running | ✔️ you plan to schedule your campaign in advance ✔️ your campaign already has a set budget and end date |
8. Refine Your Target Audience
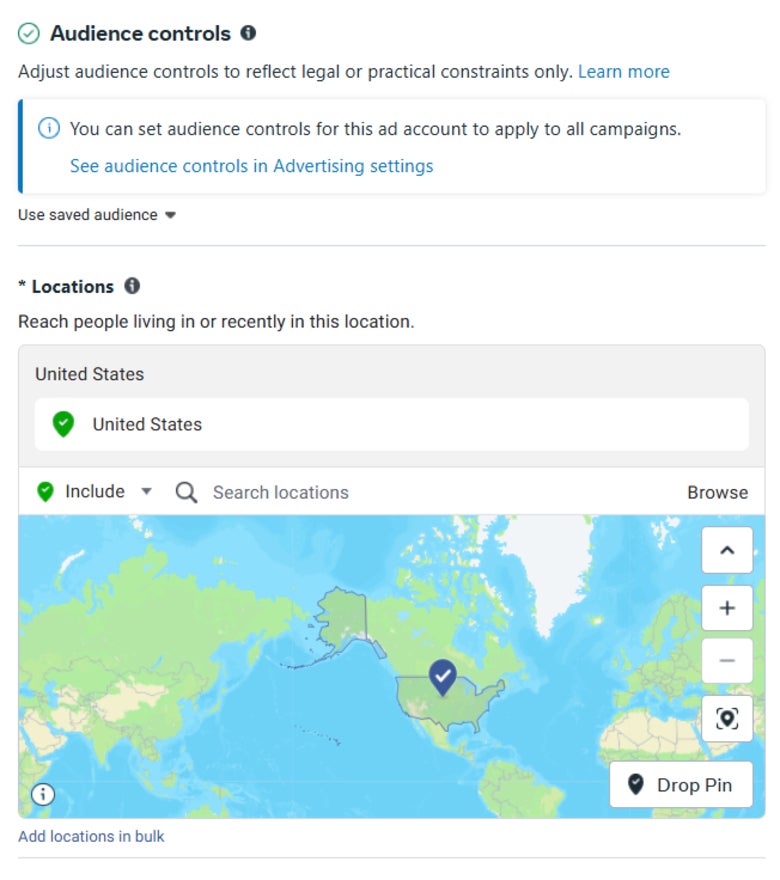
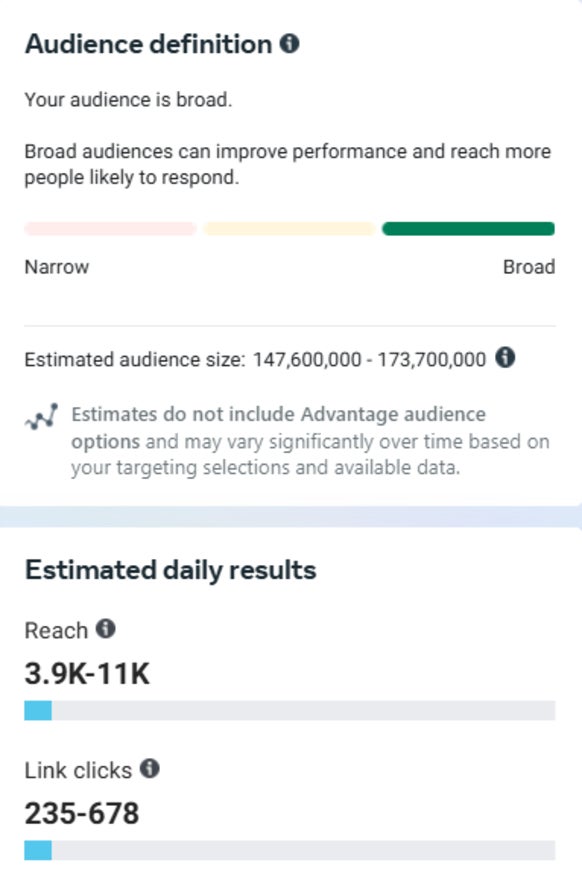
Next, enter your target audience’s basic demographics of age, location, and language in the “Audience controls” section. What you input here will determine the groups of Facebook users who will be able to see your ad, so be careful not to narrow down your options too much.
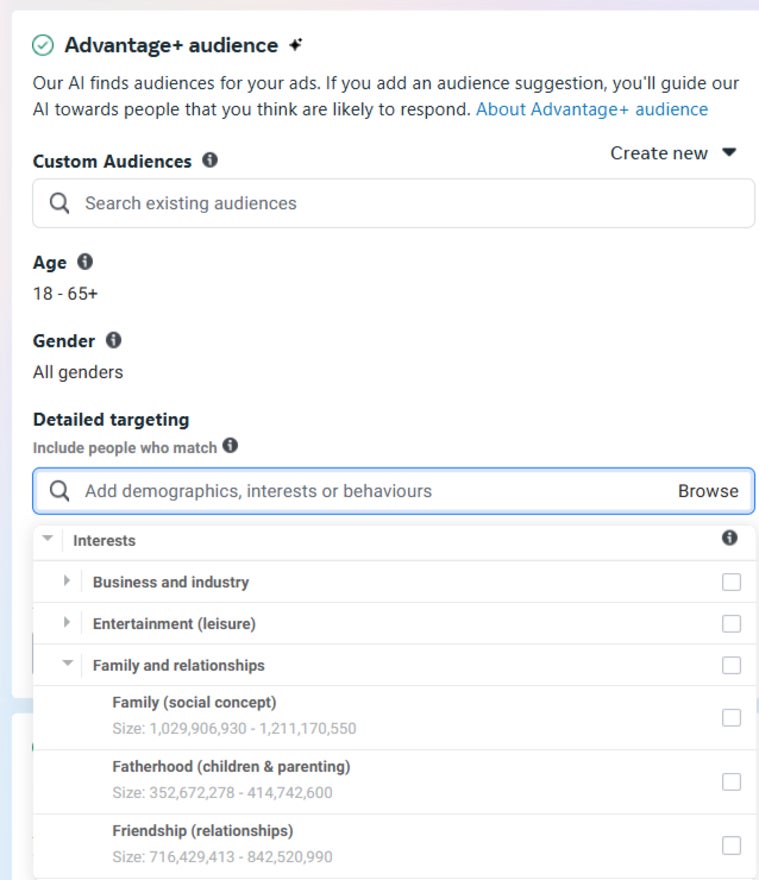
You might be slightly confused at this point, especially if you’ve run ads on Facebook in the past. Where has the precise targeting gone? Don’t worry, the “Advantage+ audience” box covers all of this, with a slight twist.
You can input the following information in this section:
- Age group(s)
- gender(s)
- Detailed demographics, including career, education, relationships, and specific life events
- Interests, such as hobbies, fitness, and food and beverages
- Behaviors, like purchase intent and device usage
The twist is that, while your “audience controls” are strict parameters, any extra information you input in the Advantage+ audience box is an “audience suggestion.”
Meta’s AI will then show your ads to audiences you’ve suggested and users outside this selection that will likely interact with your ad.
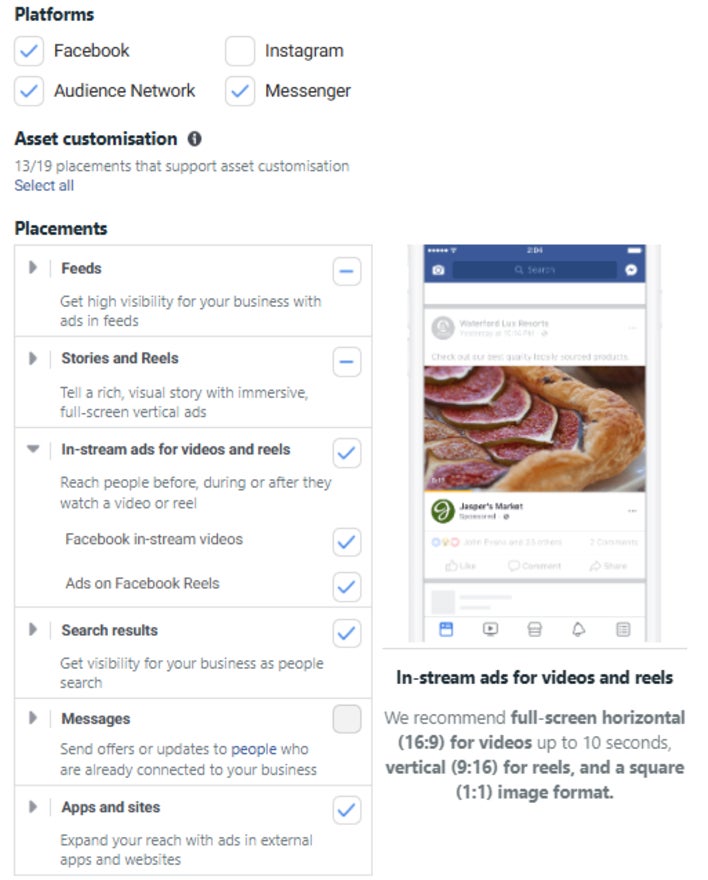
Next, you can pick your ad placements, or where your ads appear. You have two options: “Advantage+ placement” or “manual placement” – I’d recommend going with Advantage+, which will maximize your ads’ performance by enabling them to be seen on all placements across Facebook, Instagram, Messenger, and Meta Audience Network, while focusing on the placements that perform best.
9. Make Your Ad
It’s finally time to make the ads you’ll show to your audience!
First, add the Facebook page you want your ad to run from in the “identity” section. If you want it to run on your business’ Instagram, you can link that account here too.
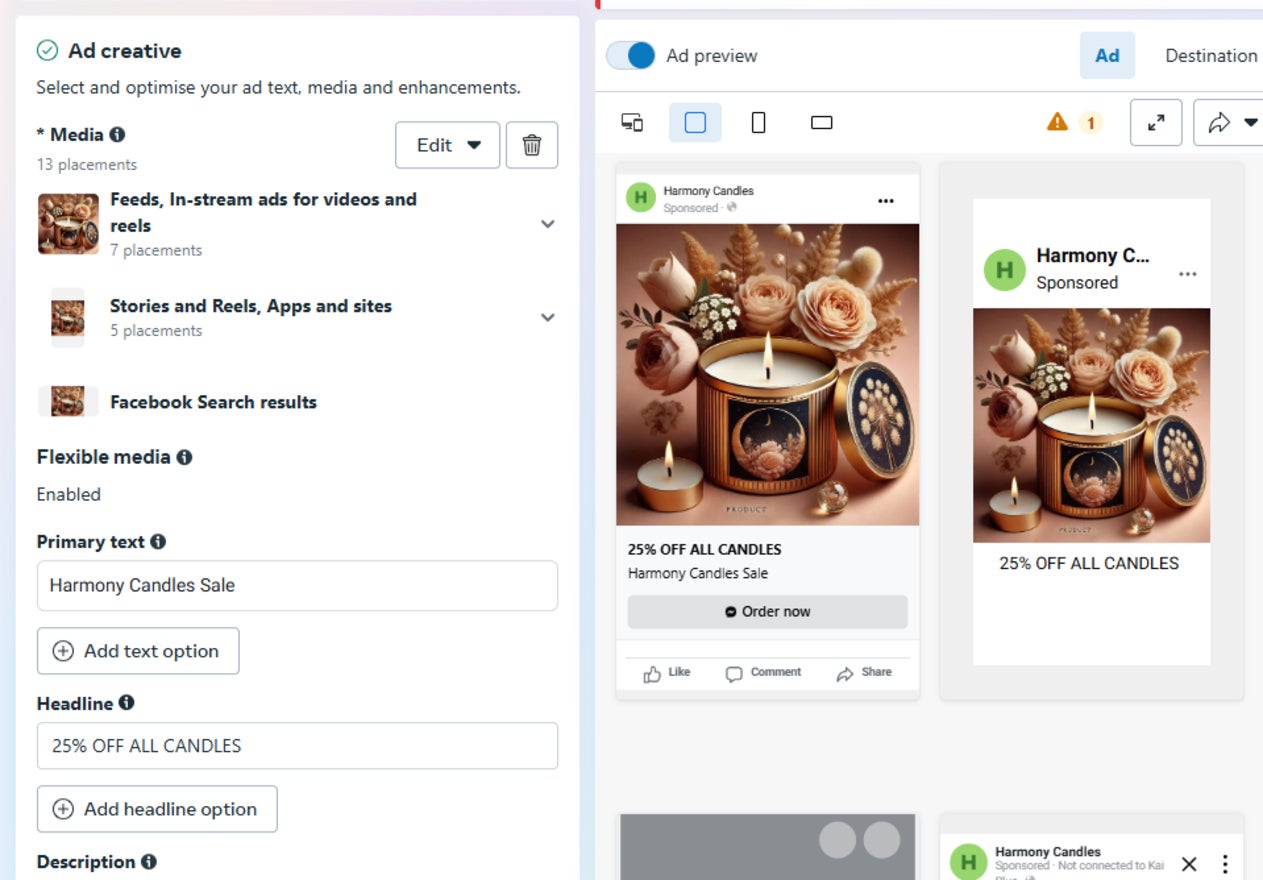
Then, in the ad setup section, select whether you want to create a new ad or recycle an existing post. I chose to make a new ad, which I was able to do in under a minute from the “Ad creative” box below. Upload your media, headline, primary text, description, and call to action and you’re done!
The “Ad setup” box is where you choose your ad format. The options available will vary depending on the objectives you set. For my “traffic” objective, I was able to choose between a single image or video and a carousel post.
How Much Does It Cost to Advertise on Facebook?
Facebook has no set minimum spend and the budget you allocate to your campaigns is up to you. On top of this, Facebook advertising costs fluctuate massively depending on plenty of variables, including:
- Targeting – advertising to niche audiences will cost more than broad targeting.
- Campaign type – lead generation campaigns cost a lot more than traffic campaigns.
- Campaign length – lengthy campaigns will require a greater overall spend.
- Performance goal – conversion goals will require a higher spend than page visits.
- Ad placement – Meta can extend your advertisements across its other platforms, which may increase costs.
- Competition – the amount of ads competing at auction will fluctuate depending on factors like your industry or the time of year. During these periods, you’ll have to pay more to make your ads stand out.
Since you’ll be competing against others for advertising space, the amount you spend needs to be competitive if you want your campaign to make an impact. However, since the spend varies so greatly between businesses, choosing a sensible starting bid can be difficult.
In these instances, it’s helpful to start by matching your bid to the average Facebook advertising spend so you’re not dramatically under or over bidding.
Based on September 2024 data by Wordstream, the average spends are as follows:
- Cost per click(CPC) – $0.77 for lead campaigns, $1.88 for traffic campaigns
- Cost per lead (CPL) – $21.98
Once your campaign is live, you should monitor its progress and tweak your budget until you find what works best.
Tips for Success
I’ve included some handy tips throughout this guide, but here are some extra ways to advertise on Facebook with success!
- Expand your audience size to reduce cost: Broadening your targeting is the least limiting way to lower your ad spend. Other tactics, like reducing ad placements, will rapidly lower your exposure.
- Add Meta Pixel to your website: This is a snippet of code that helps you to continually improve your Facebook ad campaigns by tracking the actions your site visitors take. Plus, it’ll monitor other audience behaviors and patterns so you can create custom audience groups to target for future ad campaigns and improve your overall customer acquisition strategy.
- Use multiple “Advantage+” options: Advantage+ optimizations can be used at many points throughout your campaign set up. For each area that Advantage+ is enabled, more data is shared with the ad delivery system to improve ad performance and accuracy. For example, using Advantage+ placements alone may push your ads to platforms your target audience don’t use, but using it in conjunction with Advantage+ audience will tell the ad delivery system to find the people who are most likely to engage with those ads.
Summary
That’s a wrap! I’ve shown you how to advertise on Facebook in nine easy steps. Following these tips and tricks will help you to promote your website, products, and services effectively, and start seeing positive results. Plus, Facebook’s Advantage+ optimizations make it easy for even the most inexperienced advertisers to create standout campaigns.
After your campaign is up and running, be sure to monitor its progress by using Meta Pixel and the ”Ads reporting” section of your Meta Ads Manager dashboard. You can use this information to adjust key factors such as your budget, audience size, and performance goals, to continually improve your Facebook ad campaigns.
Leave a comment