How to Make a Multilingual Website on WordPress
If you click to purchase a product or service based on our independent recommendations and impartial reviews, we may receive a commission. Learn more
Create a Multilanguage WordPress Website in 11 Steps

Hello! Or should we say bonjour, hallo, hola, hej, or ciao? After all, why should you limit your website to just one language?
Creating a multilingual site is the key to expanding and reaching new audiences – in the US alone, at least one in five people speak a language other than English at home. When you factor that in, the real question is, why wouldn’t you want to create a multilingual website?
With that said, the answer is pretty clear – creating a multilingual website is hard. Or it can be, especially if you’re using WordPress.
This would usually be a job for a developer, which might be beyond your budget. Luckily, there are plugins out there that can make your multilingual dreams come true.
This guide will walk you through building your very own multilanguage WordPress website, using the WPML (WordPress Multilingual) plugin. This is much easier than doing it manually, but just a heads up – we recommend only following these steps if you’re a fairly confident WordPress user.
Why Do We Recommend the WPML Plugin?
We use the WPML plugin ourselves to translate pages right here at Website Builder Expert, so we can recommend it from personal experience. It’s also the most advanced and well-rounded translation plugin!
Here’s what our Full Stack WordPress Developer, Fernando Paredes, had to say about WPML:
“WPML is the industry standard for WordPress multilingual sites – most plugins and themes that have any kind of multilingual plugin integration are designed solely for WPML. It offers integrations with several major WordPress plugins, including WooCommerce.
The advantage of using a plugin is that it makes setup easier and centralizes everything in one place, making it easier to manage.”
Further Information
- Just starting out? Check out our guide on How to Create a WordPress Website.
- Need some extra tips? Our 15 WordPress Tips for Beginners could be worth a read.
- Woops! WordPress not for you? Not to worry – take a look at our Website Builder Comparison Chart for an easier start.
1 Get a Domain
The very first thing you need to do is get yourself a domain name. This acts as your site’s unique address, and is what people will use to find you – for example, our domain is websitebuilderexpert.com.
You can either buy your domain from a registrar like GoDaddy, or choose a hosting provider that includes one for free. Both are good, trustworthy options, so it’s just a matter of deciding what’s best for you. Hosting plans usually give you a free domain for one year, after which you’ll need to pay yearly.
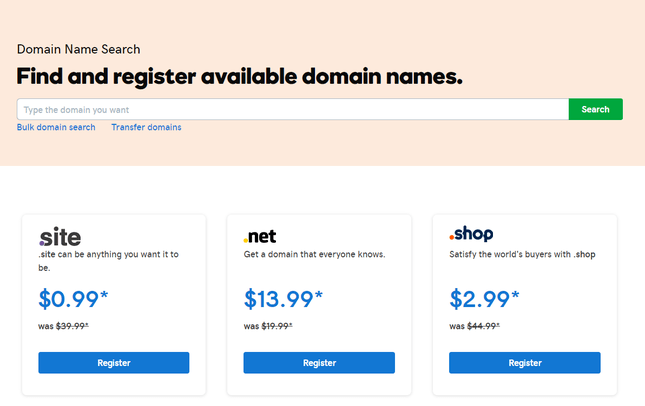
The annual cost of a domain can vary between $0.99 and $60, depending on whether you want it to end in something common (such as .com) or a pricier option (like .io).
Make sure your domain is short, snappy, unique, and memorable. This is how people will identify your website, so you want it to reflect your website’s content!
Because you’ll be using the plugin WPML to create your multilingual website, you don’t need to create tons of different domain names for separate sites. Leave that hassle behind, and move onto the next step – the search for the perfect hosting provider.
- Come up with ideas for your perfect domain name
- Decided between registering with your hosting provider or a registrar
- Checked your domain is available
- Secured your domain by registering it with an official registrar
2 Sign Up to a Hosting Provider
Hosting is essential for running a successful site. Without it, you can’t publish your website on the internet. On top of that crucial factor, choosing the wrong provider or hosting plan can cause your site to take ages to load, or even crash.
Fortunately, we have tons of resources to help you choose the best hosting provider for your website, from reviews to comparison charts, which you can explore at your leisure. But to save you time, here’s our top recommendation: Bluehost.

Bluehost is the best hosting provider for WordPress websites, and comes with an official recommendation from WordPress itself. It triumphed in our research, outperforming its competitors for both shared and managed WordPress hosting.
You can start your shared WordPress hosting with Bluehost for just $2.95 per month (usually $7.99 per month once your promotional period is over.) This comes with an automatic WordPress install and automatic updates, plus a free SSL certificate and free domain registration for one year.
Reasonable prices, expert WordPress support, and tons of tailored features – including automatic updates and one-click installation – all combine to make Bluehost the smart choice for any WordPress user.
Simply choose your pricing plan, connect your domain (you can either use an existing one or register a new one for free), and sign up to start your hosting.
- Researched different hosting providers to find the best one for your site
- Decided on what type of hosting you need
- Chosen a hosting plan
- Signed up for hosting and connected your domain
Further Information
- Read our Bluehost Review to find out why it’s the best choice for your WordPress site.
- Not sold on Bluehost? Find your perfect match in our review of the Best WordPress Hosts.
- Compare the best hosting providers in our Web Hosting Services Comparison Chart.
3 Set Up Your WordPress Website
Now the fun begins! Whether you’re building a blog, business site, portfolio, or even a combination of all three, now’s the time to turn your ideas into reality. We’ll quickly outline the key steps below to help you get started.
Install WordPress
You can’t build a WordPress site without WordPress. If you chose a good quality WordPress host, like Bluehost, you should be able to use a one-click or automatic install. This is the quickest, easiest, and overall best way of installing WordPress.
With one-click installation, your host does all the work for you, so all you need to do is click, sit back, relax, and then enjoy building your new WordPress site stress-free. Sounds nice, right?
The other option is to install WordPress manually. This is a less relaxing option, and can cause a lot more headaches, head banging, and cries for help. We only recommend this option if you’re technically confident, although there are plenty of beginner-friendly guides online to help walk you through the process (we’ve linked to an especially helpful one below!)
Whether you take the long or the short route, by the end, you should have WordPress fully installed and ready to go.
Further Information
- Check out our handy guide on How to Install WordPress With Bluehost.
- Are you installing WordPress manually? Here’s the official WordPress guide on How to Install WordPress – good luck!
Choose a Theme That’s Translation Ready
Choosing a theme for your WordPress site is one of the most enjoyable parts of the building process. This is where you get to decide on how your site should look. But your theme doesn’t just determine your site’s aesthetics – it also affects your site’s capabilities.
Finding the Translation Ready Themes in WordPress
The WPML plugin is compatible with most themes, but it’s still a good idea to find a theme that’s translation ready. How do you do this? First, go to the WordPress Theme Directory and go onto the Feature Filter.
Under the ‘Features’ heading, scroll down to the bottom of the list, and select the box next to ‘Translation Ready’. You can also select any other filters you want to search by, and then click ‘Apply Filters’.
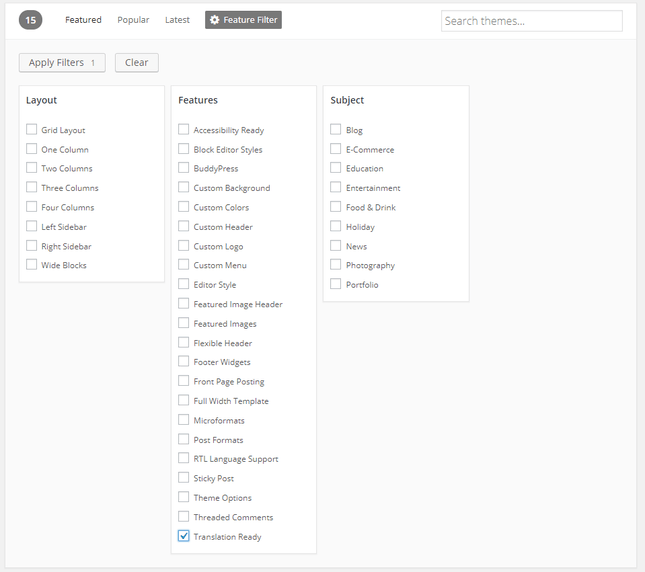
This will automatically pull up all the themes listed as being translation ready, which you can then browse through to find the one you love!
You can find both free and premium themes that are ready for translation, so it’s up to you which one is better for your personal project.
Checking If Your Theme Is Translation Ready
Now, some themes will say they’re translation ready when actually they’re not. We know, cheeky right? As we said, WPML will work with most themes, but if you want to check if your theme is translation ready, here’s how:
- Click on the theme you want to check. Scroll down and look for the link that says ‘Subversion Repository’. (Don’t worry if you have no clue what that means, we won’t be testing you!) You’ll now see a list of links – click on the bottom one, as this will be the most recent version of the theme.
- Next, you’ll see another list of links – click on the one that says “style.css” and feel free to ignore everything else on that page. This link will open up the theme’s code (you might have to download it.) If you’ve never seen a page of code before, you may well feel like you’ve just entered the Matrix!
- But not to worry – all you need to do now is search for “text domain” to see if your theme is in fact translation ready. It’s normally near the top and easy to find, but if you can’t see it just press Ctrl and F to search the page.If the words “text domain” are in the theme’s code then you’re good to go – it’s translation ready! Go ahead and install your theme so you can start putting your site together.
Add Your Content
This is the really fun part. It’s time to add content to your website and start it filling out. For now, just do this in your primary or default language. You’re the expert in your own project, so we’ll leave you to it!
Now is also a good time to add any plugins you might need – we always recommend installing the Yoast SEO plugin as soon as possible, but you might also need contact forms or customer reviews for your website. For these, you’ll need plugins, which you can find in the WordPress Plugin Directory.
- Installed WordPress
- Chosen a theme – preferably one that’s translation ready
- Added your content
- Installed any plugins you need for your site
4 Check: Is Your Site WPML Ready?
Before trying to install the WPML plugin, you need to do some homework first – in order for WPML to run, your site needs to meet certain requirements. Make sure you have the following in place, or else WPML won’t work when you install it:
- WordPress 3.9 or later
- PHP 5.6 and above
- Memory limit of at least 12MB (although 256MB is recommended)
- MySQL 5.6 or above
- The eval() PHP function must be enabled
- You must be able to create tables in your database
These are the essential functions you need to use the WPML plugin. There are a couple of other requirements if you choose certain add-ons, which we’ve highlighted below.
If you want to use WPML String Translation (which we highly recommend), you’ll need the Multibyte String extension. Likewise, for using XLIFF files in WPML Translation Management, you’ll need the SimpleXML extension.
You can see why we only recommend this process for fairly tech-savvy users!
We know this isn’t quite as fun as designing your color scheme, but it is very important. You won’t be able to move onto the next step if your site doesn’t comply with these requirements.
You can read more about the functions your site needs on WPML’s Minimum Requirements page.
- Checked if your site meets WPML’s requirements
- Made any updates to your site so it’s ready to run WPML
Further Information
- Not quite feeling up to the translation challenges of WordPress? That’s okay! You can grow your confidence with a website builder – find your perfect match in our Website Builder Comparison Chart.
5 Buy and Download the WPML Plugin
Now that you’ve set up your WordPress site, it’s time to get multilingual!
First, head to WPML.org, then click the ‘Buy and Download’ button.
This will take you to the pricing page, where you’ll need to pick your plan. WPML has three price plans: Multilingual Blog, Multilingual CMS, and Multilingual Agency.
Let’s take a quick look at each plan, to help you choose the best one for your site.
- Multilingual Blog – Upfront fee: $29. Yearly renewal cost: $21. Basic features such as translating menus, posts, pages, and categories. Best for bloggers and very simple sites.
- Multilingual CMS – Upfront fee: $79. Yearly renewal cost: $59. Full range of features, including multilingual ecommerce support and multi-user translation management. Recommended for most WordPress sites.
- Multilingual Agency – Upfront fee: $159. Yearly renewal cost: $119. Full range of advanced features, meaning you can register an unlimited number of websites. Best for agencies needing to build a large number of multilingual sites.
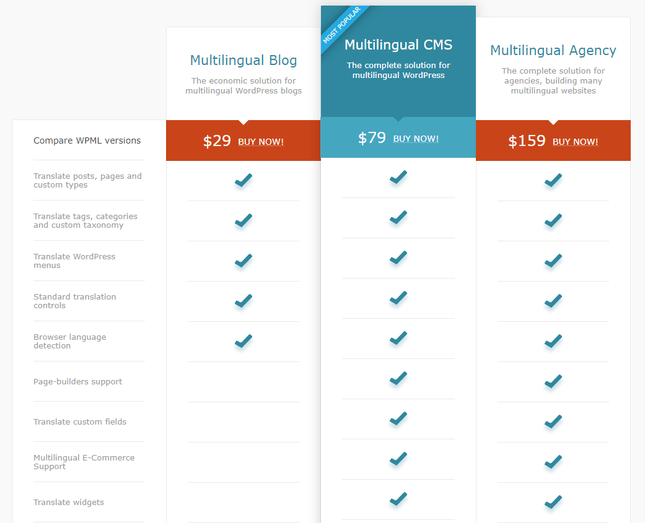
We recommend choosing the Multilingual CMS plan, because it has everything you’ll need for translating your WordPress site. The cheapest plan doesn’t let you translate widgets, for example, which could lead to frustration down the line.
An important thing to note is that you don’t have to renew every year. If you don’t pay the renewal cost, your WPML plugin won’t break, disappear, or stop working. You just won’t be able to get support, or access any downloads.
WPML doesn’t have a free version – you need to choose a paid plan so you can get started translating your website. However, every plan comes with a 30-day money back guarantee.
Once you’ve paid for your WPML plugin, click Download. This saves the plugin as a file, which you can then upload into your WordPress account.
- Visited the WPML.org website
- Viewed its price plans and chosen the best one for you
- Signed up and paid for the WPML plugin
- Downloaded the WPML plugin
6 Backup Your WordPress Website
Before doing anything else, make sure you backup your WordPress site. This is an essential step – if anything goes wrong, you’ll be grateful that you saved a recent version of your site!
If you’re not sure how to backup your site, don’t worry – it’s super easy with a plugin like UpdraftPlus. You can create a full backup of your site and download it to your computer, or even store it in Dropbox or your Google Drive.
Once you’ve saved your backup, you’ve got the green light to go ahead and install your newly downloaded WPML plugin.
- Backed up your website
7 Install the WPML Plugin
You’re now ready to install the WPML plugin. To do this, go to the Plugins section in your WordPress dashboard and click Add New. A list of plugins will appear from the WordPress directory, but ignore those – instead, click Upload Plugin at the top of the page.

Next, click Choose File, and select the WPML file you downloaded earlier. Just click Install Now, and let WordPress work its magic as it uploads your plugin for you.
Don’t forget to click Activate – you should see a new WPML option appear in your left-hand menu.
Before you move on, stay in the Plugins area of your dashboard, and select three more plugins from the WPML list in front of you. The top one should already say ‘Installed’, but you also need to tick the boxes for the following plugins:
- String Translation
- Translation Management
- Media Translation
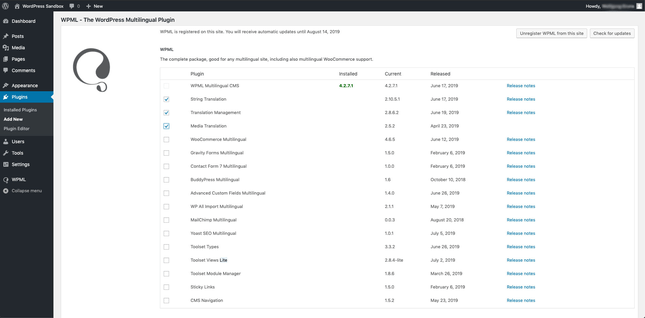
Scroll down and tick the ‘Activate after download’ option, before clicking the ‘Download’ button right next to it.
Once you’ve done that, you’re ready to start playing with your new plugin! Stay on the page you’re currently on, and we’ll show you how to set everything up in the next section.
- Installed the WPML plugin in your WordPress dashboard
- Activated the plugin
- Installed String Translation, Translation Management, and Media Translation
8 Set Up Your WPML Plugin
Before you start creating posts in a myriad of languages, there are a few bits of housekeeping to do first. You need to configure the plugin’s settings, so that it works in just the way you want it to.
First, click the blue button at the top of the screen that says ‘Configure WPML’. This will take you to the setup wizard, which we’ll walk you through now.
Set Your Default Language
The very first thing you need to do is set your default language. This should be the language your current content is already in.

Once you’ve selected your current content language, click Next.
Choose Your Languages
Now you can select the languages you want to add to your website!
There are tons to choose from, so look through them carefully to make sure you’ve got all the options you want.
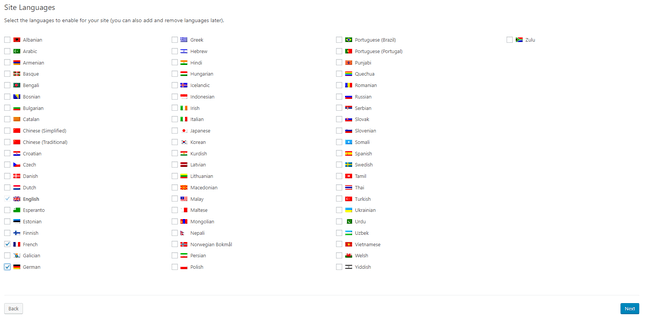
Simply tick the box next to the language you want to add to your site. If you don’t tick Italian, for example, you’ll struggle to translate any content into that language!
Add a Language Switcher
After selecting your new languages, you need to add a language switcher. What’s a language switcher? This is how your visitors will move between the different languages you’ve got on your site – you’d recognize it as a row of flags, or a dropdown list, where you can choose your language.
The WPML plugin will prompt you to add a language switcher.
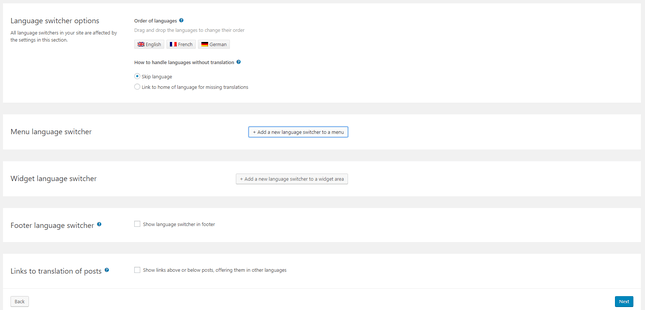
After this, you’ll need to choose whether you want a drop-down menu or a list of languages. You can manage these settings in the Language Switcher Style section.
This is also the stage where you get to choose the appearance of your menus – for example, do you want flags to appear?
You can even have the language name display in the language being used to view the page. So, if the page was being viewed in German, and the user wanted to switch to English, the language name would appear as “Englisch.”
These settings are totally up to you – choose your own preferences, then move on to the next step.

Register
Last but not least, to finish setting up your WPML plugin, you’ll need to register it. You’ll need the site key from your WPML account – simply copy and paste it into the box waiting for you in your WordPress dashboard.
There will have been an option to do this earlier, so if you’ve already entered your code, don’t worry – you can just click ‘Finish.’

Registering means you’ll receive automatic updates for WPML on your WordPress website.
That’s it! You’re ready to start translating your site’s content.
- Fully configured the WPML plugin’s settings
- Chosen your primary, or current, language
- Selected the languages you wish to add to your site
- Added a language switcher
- Set the styles you want for the language switcher
- Registered your WordPress site with your WPML account
9 Translate Your Content
A common mistake is thinking the WPML plugin will automatically translate your website’s content for you. We love this plugin, but it’s not that clever – you’ll need to translate your content yourself.
It’s easy to add new languages to your site. Go to your Posts page, and you should see flags for each of your ‘extra’ languages. Let’s say your site’s original language is English, and you’ve added Frech and German.

You’ll see a French and German flag in the header above your posts. Underneath these, next to each post, there will be blue ‘plus’ icons. To add a translation, simply click on the plus button. This will open up a page with your English content down one side, split into sections. There will be corresponding boxes on the right hand side for you to enter your translated content.
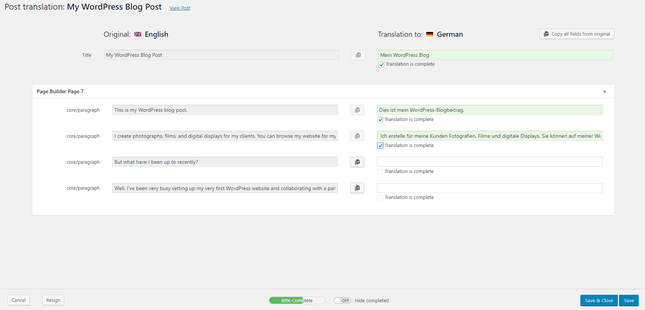
For each section, you need to tick the Translation Complete box once you’ve filled out the translation. This means you won’t accidentally miss out any of your original content.
Hold up – does that mean I just have to manually type out all my content in new languages? Well, not quite. Don’t worry if you’re not fluent in five different languages – there are plenty of ways to add multilingual content to your site.
Do It Yourself
Are you bilingual? Trilingual even? Don’t need to use clever phone apps to order drinks when you’re on holiday? You can probably go ahead and start translating, simply by using the power of your brain – impressive!
Google Translate
If you can’t translate tons of sentences off the top of your head, you can use Google Translate instead, and simply copy and paste the translation into your page.
However, as we’re sure your high school French teacher told you many times, Google Translate isn’t always fool-proof. Always make sure to double-check your translated content before publishing.
Automatic Translation
Unless you’ve paid for the basic Multilingual Blog plan, you can use WPML’s automatic machine translation.
This is like Google Translate, except it translates your content for you, without you having to leave WordPress.
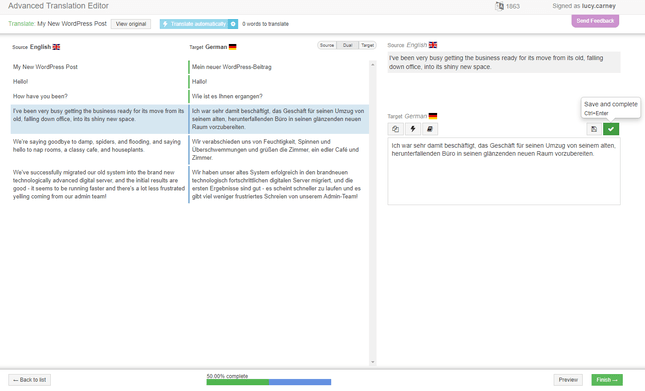
It’s a faster way of translating your site than doing it manually, especially if you’re not so gifted in the language department. When you open a page for translation, WPML shows your default language down the left-hand side, and a translation of that content down the right-hand side.
You’ll still need to go through the page and tick the green check boxes, to mark each section as translated. Once you’re sure all the content has been translated correctly, just click Finish.
To use this feature, you’ll need to enable it in your WPML settings first.
Outsource Translations
While translation tools like Google Translate are useful, they’re not super reliable when it comes to translating large bodies of text. Mistakes and mis-translations will creep in – but how will you know if you can’t speak the language yourself?
For bullet-proof translations, the most reliable method is to send your content to a translator!
It’s easy to search for freelance translators on sites such as Fiverr and People Per Hour. This way, you can see ratings and prices, and compare different translation services until you find one you’re happy to use.
WPML also has a Translation Management service, which is an add-on that allows you to work with a team of translators. You select the pages you want translated, choose which language you want them in, set a deadline, then send them off to be translated!
You should know that this service isn’t included in the cost of your plugin. It’s an add-on, meaning you will need to pay extra for these translations. Most translation costs are calculated per word, so your word count will directly impact the price you pay for your translation.
Luckily, WPML has a tool to help you with this!
When you go to your Translation Management page, WPML automatically updates your word count. This means you can get an accurate idea of how much your translation will cost.
Bring In Translators
If you don’t want to send off your content for translation, there is one more option. With WPML’s translation management, you can turn regular WordPress users into ‘Translators’. These users can only access the translation jobs given to them by ‘Translation Managers’.
You’ll need to source your own translators, but this is an easy way of managing your site. It’s especially useful if you’ve built the site, but are working with partners, clients, or freelancers to run and manage the site once it’s live.
- Translated the main content of your site
- Double-checked the quality of your translations
- Checked the formatting of your pages
10 Translate Categories and Tags
Your main content is all translated, looks beautiful, and is just waiting to be read. But something familiar catches your eye. What’s this? Have you become fluent in German? No, wait – the labels on your site have remained in English!
You still need to translate your taxonomies, such as categories and tags. For example, if you have a blog that’s split into categories like Photography, Film, Art, and News, these labels will remain in English unless you translate them.
To do this, simply go to the WPML tab in your WordPress dashboard, and go to ‘Taxonomy Translation’ in the menu. Select whichever taxonomies you would like to translate – categories, for example.
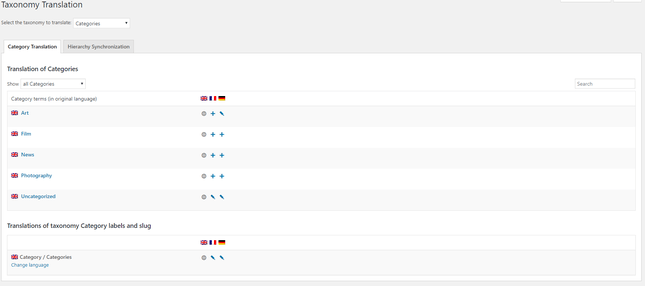
This will bring up all the categories from your site. All you need to do is click the blue plus button under the relevant language to translate each one.
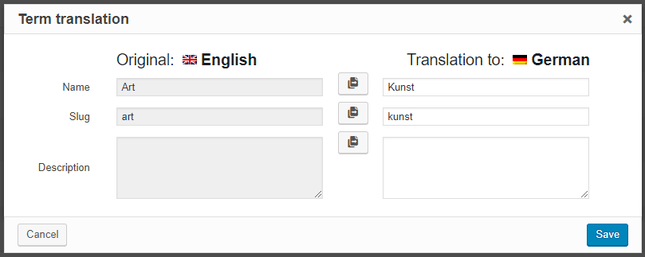
- Translated all your categories, tags, and any other taxonomies
11 Translate Menus, Themes, and Plugins
Don’t forget about all the extra content on your site that also needs translating. How will your users find their way around your site if your menu is in a different language?
Head to the Appearance and Menus section of your WordPress dashboard. You should see your menu displayed on the right-hand side, with links to your extra languages.
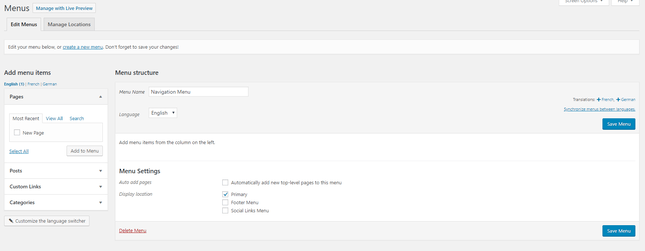
Click on the language you want to translate your menu into, and this will create a new menu just for that language.
As long as you have already translated your posts and pages, you can simply add these to your new navigation menu from the left-hand side of the screen.
Translating Themes, Plugins, and Widgets
While some pieces of text – like categories and menus – are easy for you to edit yourself, other content is actually built into your site. Luckily, there is still a way to totally translate your site. Do you remember that String Translation you installed earlier? Well, now we’re going to put it to good use!
Go to the WPML section of your WordPress dashboard, then head to the ‘Themes and Plugins Localization’ page.
You’ll see that one option is already selected by default. This will usually be the “Don’t use String Translation to translate the theme and plugins” setting. If you went to the trouble of making sure your theme is 100% translatable, you can tick the box underneath, which says: “Automatically load the theme’s .mo file using ‘load_theme_textdomain.”
However, we recommend that instead, you tick the top option: “Translate the theme and plugins using WPML’s String Translation.” This lets you translate your theme, plugins, admin text, and even widget content!

Simply tick the box, click Save, and you’ll be able to finish translating your now multilingual website.
- Translated your menus
- Enabled String Translation in your settings
- Translated content such as widgets, plugins, and your theme’s text
How to Make a Multilingual Website on WordPress: Summary
You’re ready to go!
We’ve shown you how to build your very own multilingual WordPress website from scratch, using the WPML plugin. From choosing a domain, all the way through to the different ways you can translate your content, we’ve covered everything you might need.
Let’s have a recap of the steps you’ve taken to get here:
- Get a Domain
- Sign Up to a Hosting Provider
- Set Up Your WordPress Website
- Check: Is Your Site WPML Ready?
- Buy and Download the WPML Plugin
- Backup Your WordPress Website
- Install the WPML Plugin
- Set Up Your WPML Plugin
- Translate Your Content
- Translate Categories and Tags
- Translate Menus, Themes, and Plugins
Some steps will take more time and effort than others. We don’t expect you to do all this in one sitting! Get started today, but don’t rush – this guide will be here for you to come back to as you build your multilingual website.
Although WPML does make translating your WordPress site as easy as possible, this is still quite a thorough and at times technical process. We have no doubt you can do it with our handy guide, but if you’re thinking this might not be quite for you, don’t worry.
There are alternatives to using WordPress and WPML to create your multilingual website.
Website builders are a much more beginner-friendly option that also allow you to translate your content, without all the hassle. We’re not saying they’re for everybody, but if a website builder sounds like it could be for you, we can point you in the right direction. Start off with the links we’ve included below!
For those of you who are ready and raring to get started with the steps in our guide, we can give you a helping hand too. Good hosting is essential for your site’s success, so we highly recommend signing up to Bluehost, as it’s the best WordPress hosting provider.
With those parting words of wisdom, we’ll let you get started building your very own multilingual site – come back and let us know how you get on in the comments!
Further Information
- Find the perfect website builder for you in our Website Builder Comparison Chart.
- We’ve tested over 50 web builders so far. Read our review of the 10 Best Website Builders to find your perfect match.


Leave a comment